[AWS Amplify] OAuth 2.0으로 Google 로그인 설정하기
AWS Amplify에서 OAuth를 통해서 구글 등 제3자인증을 가능하게 하는 방법은 나름 간편하고,
아래 메뉴얼대로 하면 아무 문제없이 진행할 수 있을줄 알았지만...
의외로 몇가지 면에서 시행착오를 겪게 되어 시행착오를 반복하지 않기 위해 기록을 남겨본다.
순서
1단계 : Auth Provider Setup
OAuth는 어떻게 보면 귀찮고 번거로운 유저 인증 작업을 구글, 페이스북 등 제 3자가 대신 해주는 시스템이다.
이를 위해서 는 제3자가 인증을 해줄 수 있게 해당 플랫폼에 가서 설정을 몇가지 해주면 된다.
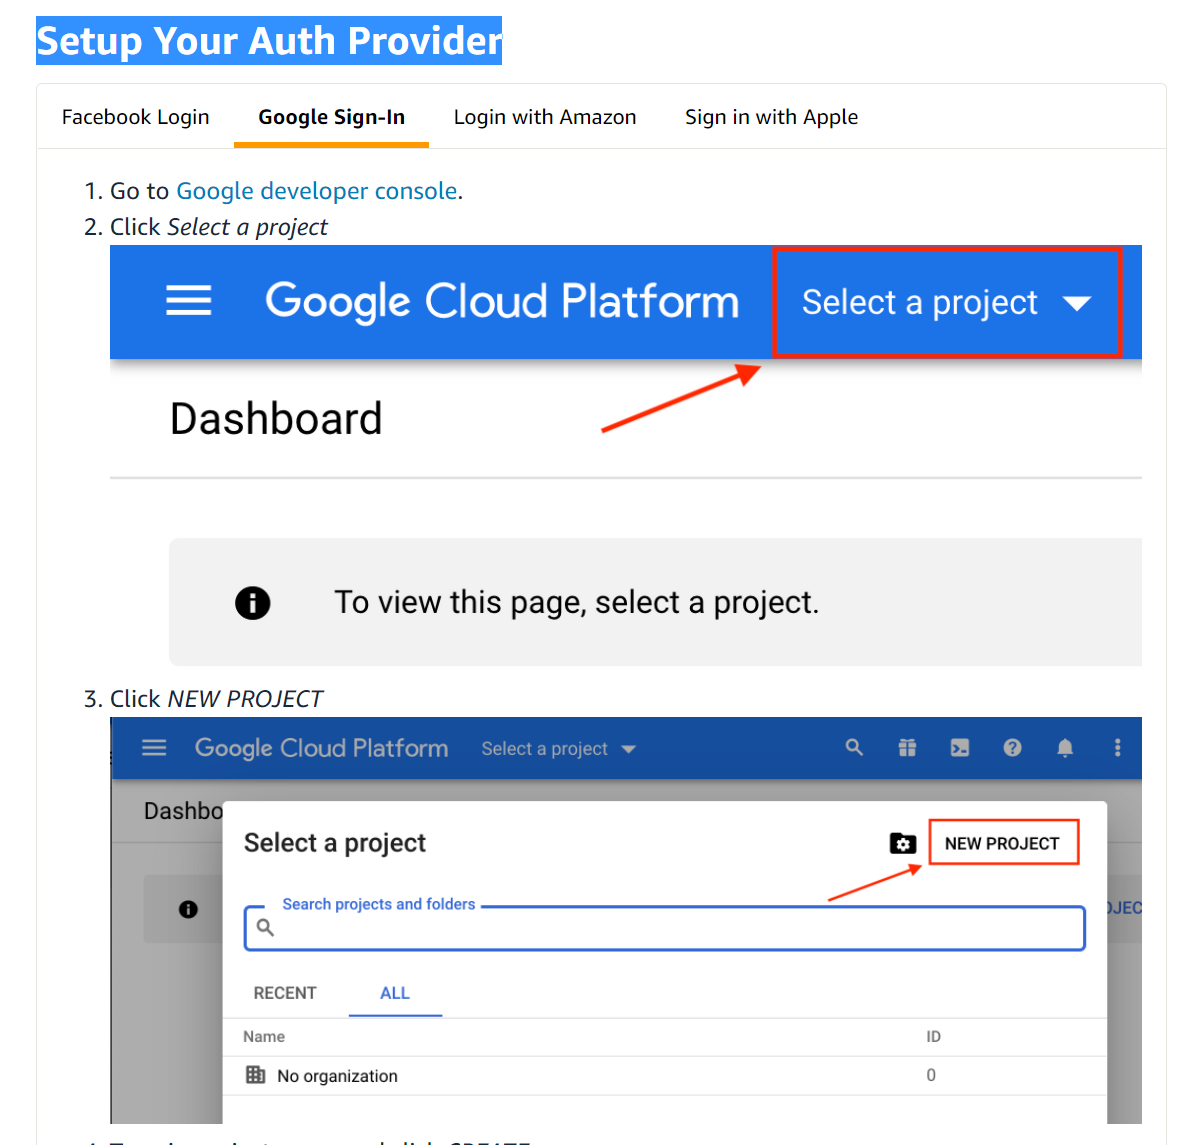
구글의 경우 구글클라우드플랫폼에 들어가서 아래 순서로 설정을 해주면 되고, 관련 설명은
AWS docs가 잘 나와있다.
https://docs.amplify.aws/lib/auth/social/q/platform/js#oauth-and-federation-overview
2단계 : AWS Amplify에서 auth 설정해주기
CLI에서 amplify add auth를 치고, 아래와 같이 설정해준다.
Do you want to use the default authentication and security configuration? Default configuration with Social Provider (Federation)
 Warning: you will not be able to edit these selections.
 How do you want users to be able to sign in? Email
 Do you want to configure advanced settings? No, I am done.
 What domain name prefix do you want to use? googlesignin ## 기억하기 쉬운 이름으로
 Enter your redirect signin URI: https://main.dpdzznty4hgmh.amplifyapp.com/ ## 본인의 원래 Amplify 앱 Url
? Do you want to add another redirect signin URI No
 Enter your redirect signout URI: https://main.dpdzznty4hgmh.amplifyapp.com/
? Do you want to add another redirect signout URI No
 Select the social providers you want to configure for your user pool: Google
저렇게 하고 Amplify Push를 하면 설정이 완료되어야 하지만.. 아래 작업을 추가로 해주기
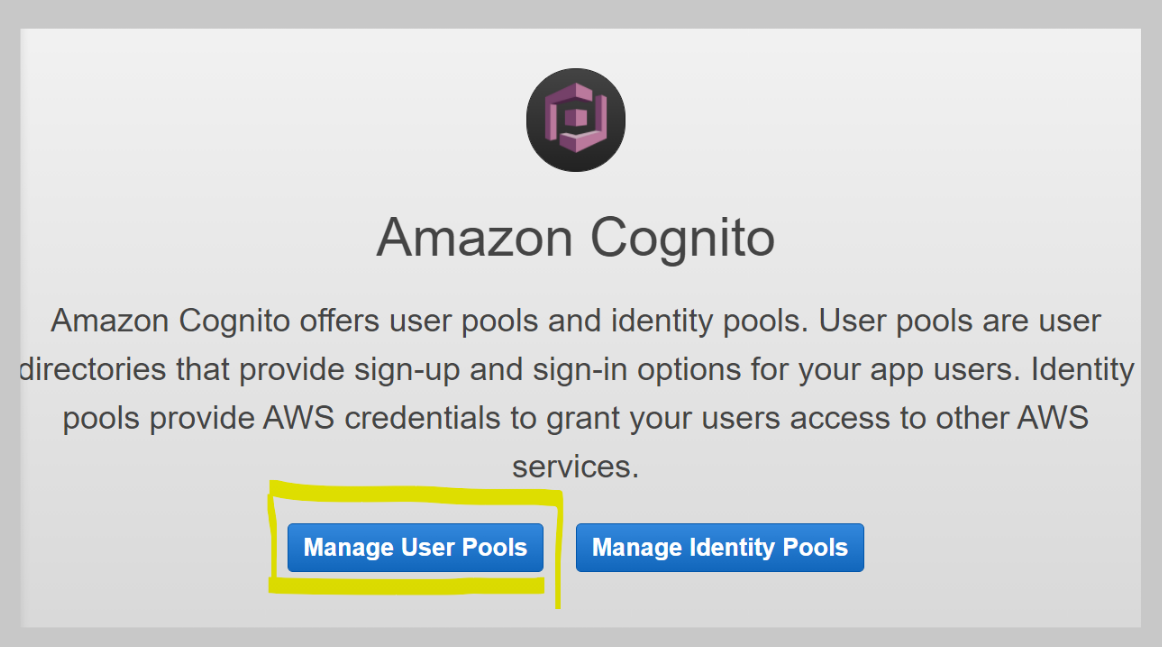
3단계 : AWS Cognito 콘솔로 들어가서 셋팅 마무리
AWS Amplify는 앱개발을 쉽고 간편하게 하도록 AWS의 여러 서비스들을 한곳으로 연결해주는 플랫폼이다.
실제로 AWS 서비스 중 인증(Authorization) 을 담당하는 서비스는 AWS Cognito이다.
콘솔로 로그인해서 설정을 몇가지 해줘야 Oauth 인증이 이상없이 잘 마무리될 수 있다.
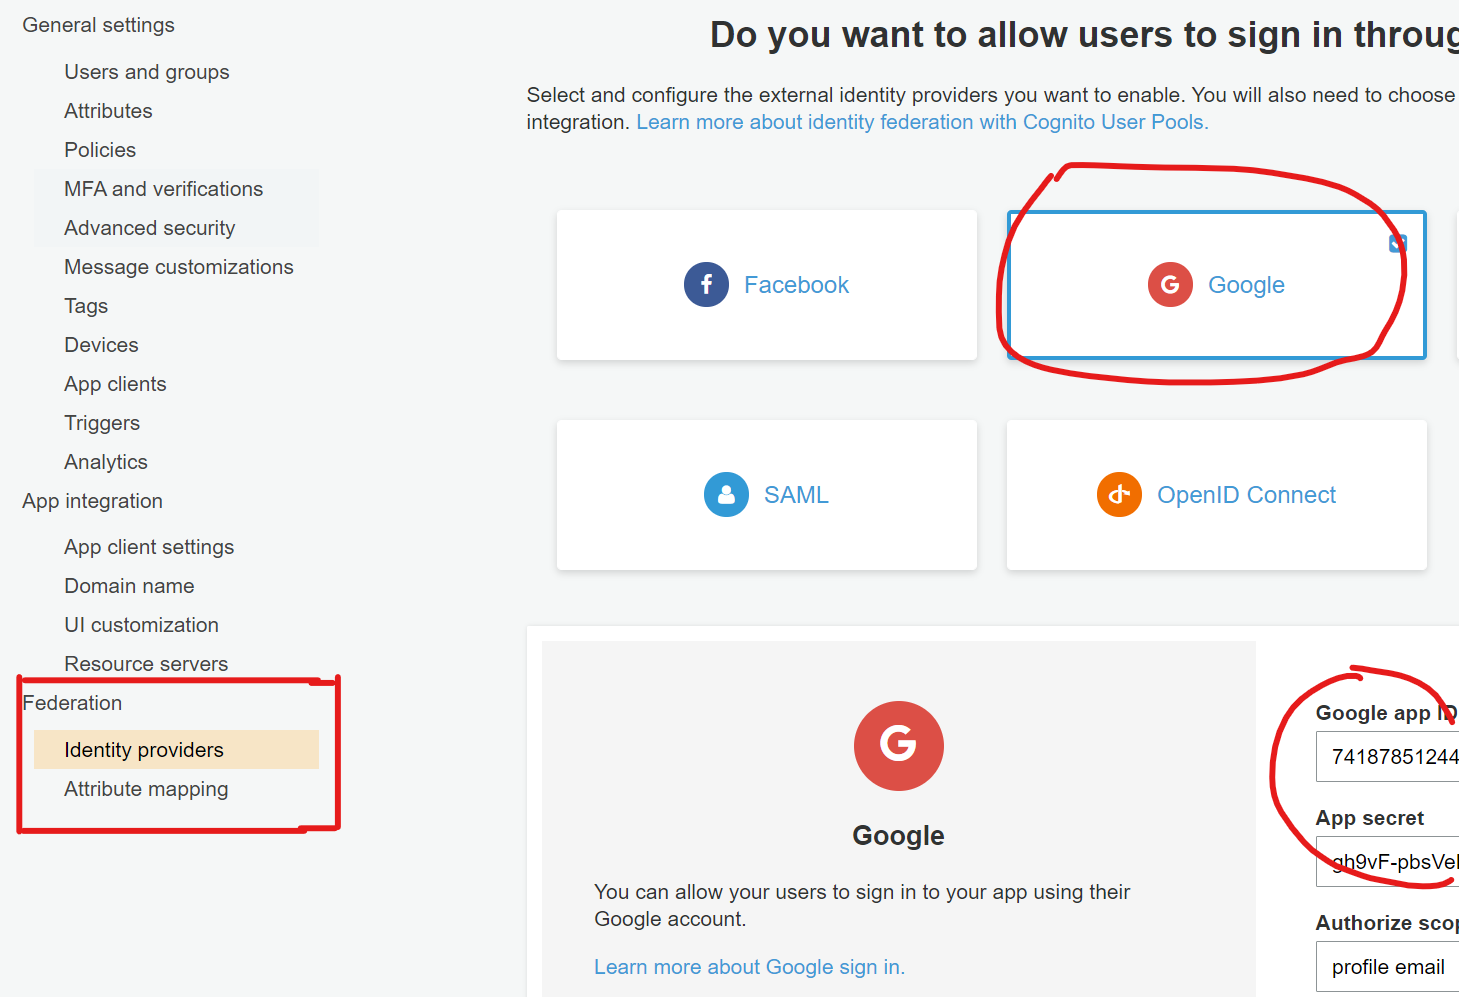
1) Amazon Cognito → Manager User Pools 접속
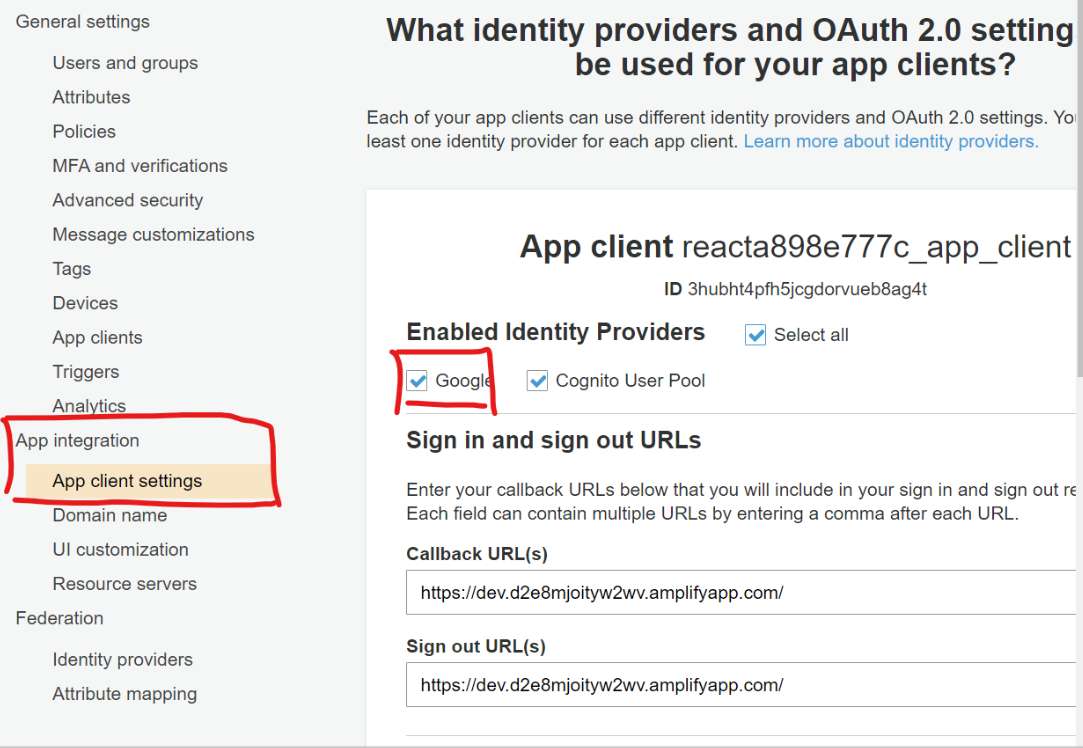
2) App Client settings에서
a) Enabled Identity Provider에 Google 체크
b) Allow OAuth Flows에서 Implicit Grant 체크
3) Federation - Identity providers에 들어가서 (1단계)에서 발급받은 app ID, App secret, Authorize scope 기입
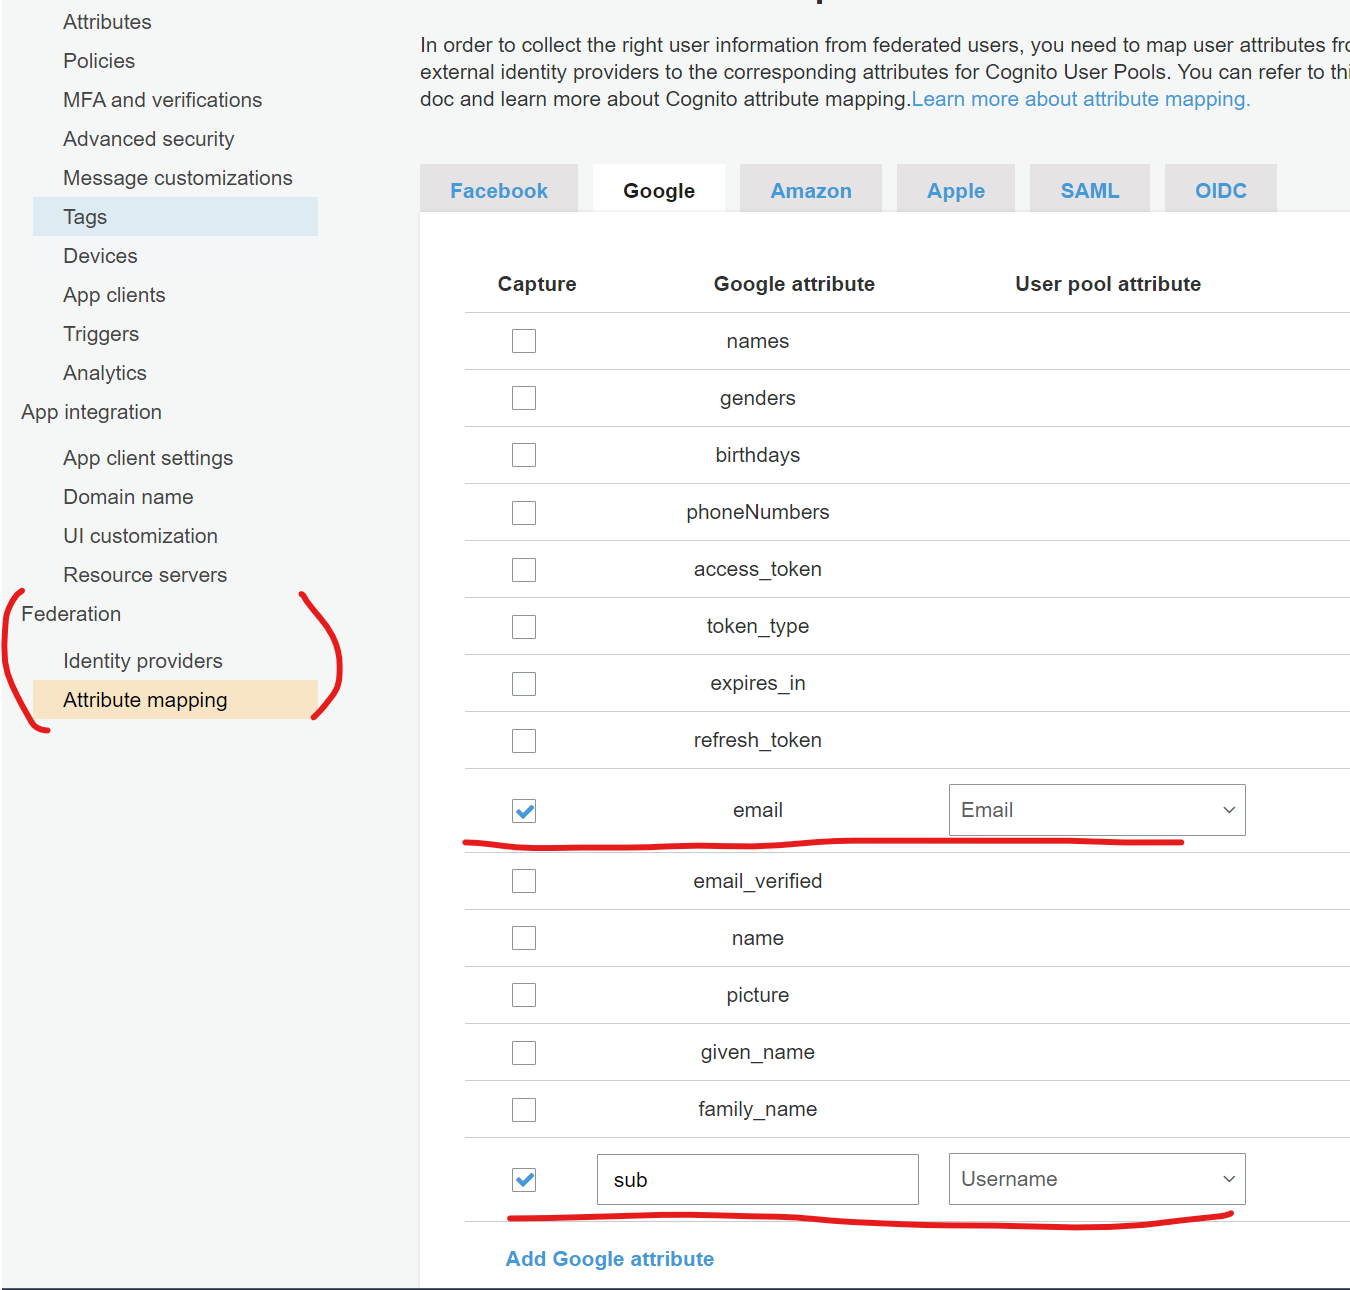
4) Federation - Attribute mapping에 들어가서 email 체크 및 Email에 대응
(Googla Oauth로 조회한 유저 정보를 AWS Cognito 내의 user 정보로 전환하는 과정이다. 이 절차가 있어야 내 코드나 앱에서 email, username 등을 조회할 수 있다.

4단계 : 내 코드에 적용 (로그인 페이지 만들기)
기존 App.js를 MyHome이라는 클라스로 빼고, 새로운 App.js에서는 OAuth로 유저가 인증하는 절차를 기다리고, 인증이 완료되면 MyHome으로 넘어가도록 코드를 일부 수정해준다.
import React, { useEffect, useState } from 'react';
import { Hub, Auth } from 'aws-amplify';
import './App.css';
import MyHome from './modules/MyHome';

import Landing from './modules/Landing';

function App() {
// init state to store user
const [user, setUser] = useState(null);

// get user
// 유저 정보 token은 Auth,currentAuthenticatedUser에서 조회할 수 있음
async function getUser() {
try {
const token = await Auth.currentAuthenticatedUser();
   setUser(token);
} catch(err) {
   console.log(err);
   }
}
//listen for sign in + out events, if neither are happening check if user exists
useEffect(() => {
Hub.listen('auth', ({ payload }) => {
   if (payload.event === 'signIn') {
      return getUser();
}
   if (payload.event === 'signOut') {
      setUser(null);
      return setLoading(false);
     }
});
getUser();
}, []);


return (
<div className="App">
  {user
     ? <MyHome email={user.attributes.email}/>
     : <Landing/>}
</div>
)};

export default (App);
import React from 'react';
import React from 'react';
import { Auth } from 'aws-amplify';
import btn from '../assets/auth/btn_google_signin_light_normal_web.png';
const GoogleSignIn = () => {
return (
<button onClick={() => Auth.federatedSignIn({ provider:"Google" })}>
<img src={btn} alt="Google Sign In button"
className="googleSignIn"
style={{height:"45px", width:"190px"}}/>
</button>
);
}
export default GoogleSignIn;
const Landing = () => {
return (
<div>
<h3>Authenticate to continue</h3>
<GoogleSignIn/>
</div>);
}
export default Landing;
기타
- 위 예시에서는 redirect URI를 앱 URI 하나로만 했다. 다른 예제나 자료를 보면 localhost도 URI에 추가하지만, 이경우 redirect mismatch 오류가 나와서 위에서는 제외했다. 로컬환경이랑 배포환경 모두 테스트해보고 싶을 때는 아래 링크 참고 https://levelup.gitconnected.com/set-up-an-aws-amplify-app-with-google-sign-in-c738df79d272
참고자료
https://aws.amazon.com/ko/premiumsupport/knowledge-center/cognito-google-social-identity-provider/
https://levelup.gitconnected.com/set-up-an-aws-amplify-app-with-google-sign-in-c738df79d272